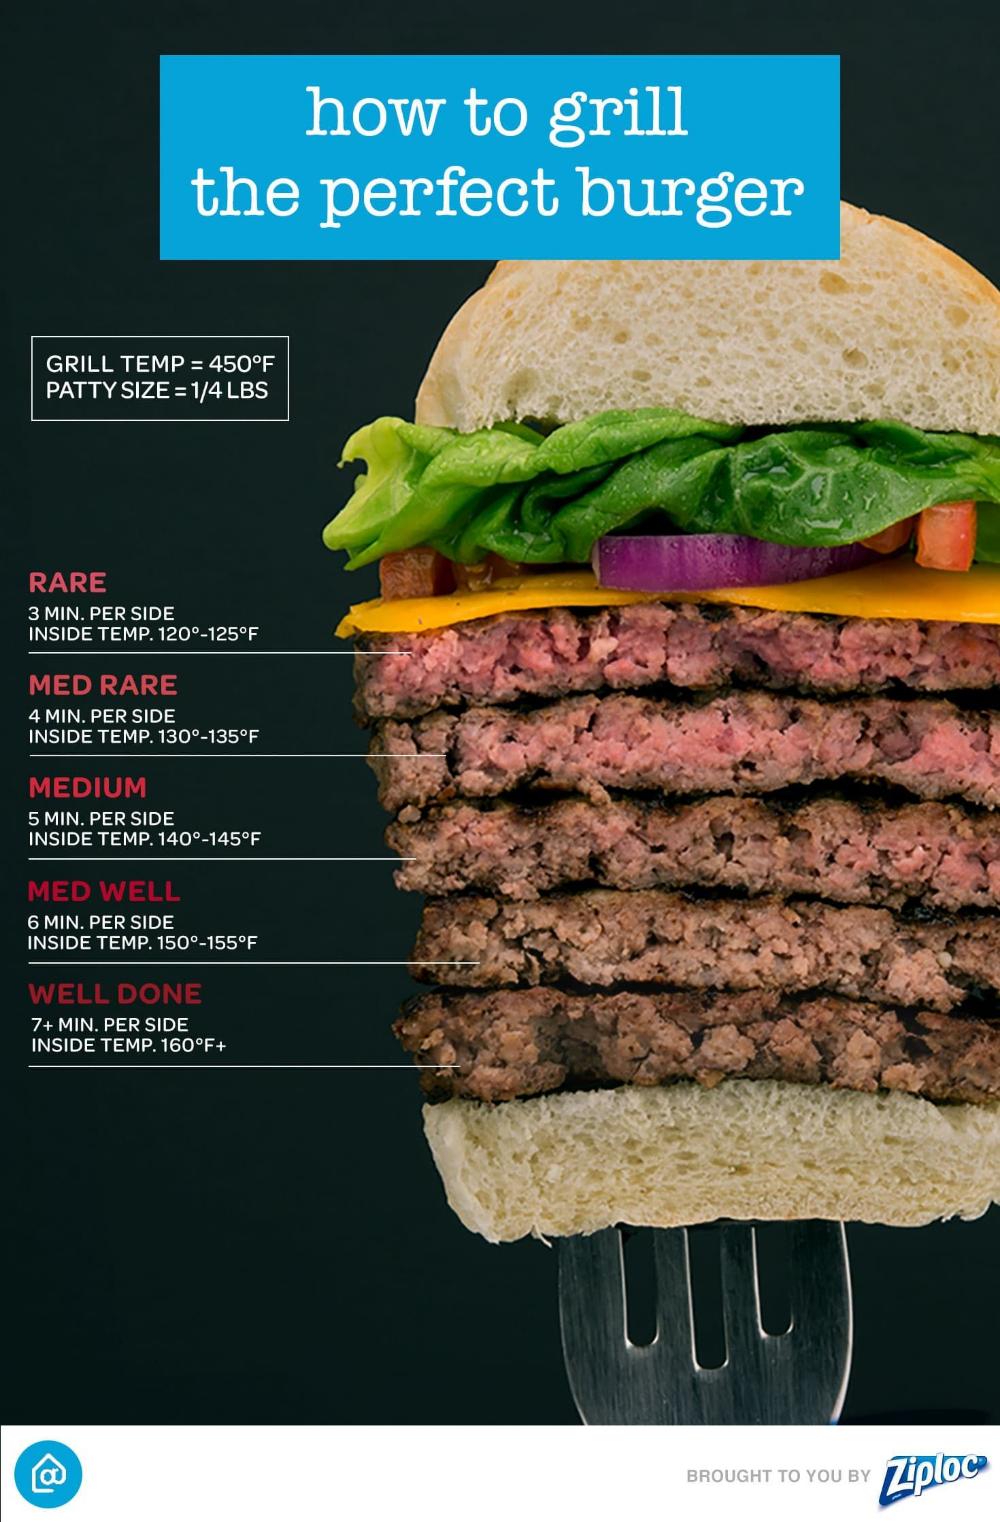
Hibachi vs Teriyaki: Unraveling the Signature Flavors

– The difference between hibachi and teriyaki
– Hibachi refers to both the grill type and the Japanese dishes made on it
– Teriyaki refers only to the style of the dish
– Hibachi is a traditional Japanese heater used for burning charcoal or wood
– Hibachi can be a portable or built-in grill in the United States
– Hibachi cooking tips include preheating the grill, using a timer, and checking internal meat temperature
– Hibachi-style dishes consist of thinly sliced meat, seafood, or poultry, vegetables, cooked rice, and soy sauce
– Teriyaki-style dishes use a thin glaze made from soy sauce, sake, mirin, sugar, and optional spices
– Teriyaki involves marinating and grilling meat or fish with the teriyaki sauce for a glossy finish
– Both hibachi and teriyaki dishes are cooked in a similar method, with the key difference being the sauce used

Continue Reading

Knockwurst vs Bratwurst: A Sizzling Journey Through German Sausage Traditions

– Bratwurst is made from ground veal or ground pork and is seasoned, while knockwurst is made from finely-ground beef and pork and has 30% less fat than supermarket versions.
– The knockwurst is heated in hot water before consumption, while the bratwurst is browned on a grill or griddle.
– The original spelling of bratwurst was “Brätwurst” but the dots above the letter ‘a’ have disappeared over the years.
– The article recommends eating bratwurst and knockwurst with sauerkraut, red cabbage, sweet and spicy mustard, and curry ketchup.
– Bratwurst has a more delicate flavor with hints of spices like marjoram and nutmeg, while knockwurst has a more intense and rich flavor with paprika, mace, and garlic.
– Knockwurst is traditionally made from pork and veal, while bratwurst is made from pork and beef.
– Knockwurst is seasoned with salt, white pepper, mace, paprika, coriander, allspice, and garlic, while bratwurst has a subtle mix of ingredients including nutmeg, salt, marjoram, and pepper.
– Knockwurst is smaller and bulkier, while bratwurst is longer and thinner.
– Bratwurst has a light pink tint, while knockwurst tends to have an orange or red tinge.
– Bratwurst is commonly served on a bread bun with mustard and fried onions, or braised in beer and onions. It can also be used in nachos, casseroles, and kebab skewers.
– Knockwurst is often eaten plain, boiled with potatoes, bacon, and onion sauce, or used in pasta and winter casseroles.
– In terms of nutritional content, bratwurst is considered healthier than knockwurst. Bratwurst has fewer calories, carbs, fat, and sodium, but is higher in protein, potassium, iron, phosphorous, magnesium, zinc, copper, thiamin, riboflavin, niacin, and vitamin B6.
– Both sausages are considered fatty and calorie-dense, so they should be eaten in moderation. Excessive sodium intake may lead to high blood pressure and heart problems.
– Knockwurst and bratwurst can be substituted for each other in recipes or eaten plain with mustard or ketchup on top.
– Recommended sides for bratwurst include sauerkraut, coleslaw, salad, mashed potatoes, and roasted vegetables. Mustard varieties like Sriracha, honey mustard sauce, and spicy brown or Dijon mustard also pair well.
– Knockwurst has a garlicky flavor and should be paired with dishes that can handle its strong taste, such as potatoes flavored with onion and mustard, grilled corn, or caramelized onions.
– The choice between knockwurst and bratwurst depends on personal preferences and desired flavors.

Continue Reading

Skirt Steak vs Flank Steak: Unveiling the Juicy Secrets

– Flank steak is a cut of meat with a thinness and distinct grain.
– It is ideal for marinating as the seasonings can penetrate into the meat.
– Flank steak is also suitable for pan-searing, grilling, and stir-frying.
– Skirt steak, similar to flank steak, has thinness and distinct grain.
– Skirt steak is also ideal for marinating and can be cooked through pan-searing, grilling, and stir-frying.

Continue Reading

What is Bavette Steak? A Delectable and Savory Culinary Delight

– Bavette steak is a lesser-known name for flank steak.
– It is commonly used in dishes like stir-fries, fajitas, and salads.
– It is beefy and rich in flavor, but can be tougher than other cuts of meat.
– It is often cheaper due to its common usage.
– Only about 2 to 4 pounds of bavette steak can be found in each cow.
– It may be harder to find in smaller towns, but specialty butchers and online meat suppliers may have it.
– It should be cooked to a tender and juicy texture, and overcooking can ruin it.
– Bringing the steak to room temperature before cooking is recommended.
– Excess fat should be trimmed before cooking.
– Pan-frying or grilling are recommended cooking methods.
– Marinades and dry rubs can enhance flavor.
– The bavette steak should be cooked quickly at high temperatures to a medium-rare state.
– It takes approximately 2 to 3 minutes on each side to cook the bavette steak.
– The USDA recommends that beef reach a temperature of 145℉ (63°C) before consuming, but restaurants often serve it at 130℉ (37°C).
– It is important to let the steak rest for 5-10 minutes after cooking to recirculate the juices.
– Bavette steak and skirt steak are two different cuts of meat, although they have a similar appearance.
– Bavette steak comes from the bottom sirloin, while skirt steak comes from the underbelly.
– Bavette steak can be stored in the refrigerator for 3 to 5 days if wrapped in plastic or stored in an airtight container.
– It can be stored in the freezer for up to 6 months if properly packaged.
– Cooked bavette steak can be stored in the refrigerator for 3 to 4 days in an airtight container and in the freezer for up to 2 to 3 months.

Continue Reading

Hamburger Medium Temp: Exploring the Perfect Cooked Burger

– USDA mandates that pre-ground meat must be cooked to an internal temperature of 160°F for food safety
– Ground poultry must be cooked to 165°F to be considered safe
– Bacteria is on the surface of steaks and whole pieces of meat, so searing at high temperatures kills surface bacteria and makes the inside safe to eat at medium-rare temperatures
– Grinding up steak distributes bacteria throughout the ground meat, so it must be cooked to 160°F in the middle to ensure all bacteria is killed
– Use a reliable meat instant read thermometer for accurate temperature control
– Ground beef is more susceptible to contamination compared to whole cuts
– Multiple cows can be processed into pre-ground beef, contaminating the entire batch if even 1% is tainted
– USDA guidelines for cooking temperatures are seen as stringent by some chefs. Restaurants and chefs must follow guidelines from the USDA and local health departments to ensure public safety and prevent foodborne illnesses.
– Grind your own beef to have more control over the safety of the meat. Follow guidelines such as keeping ground beef cold, using separate prep areas for raw meat and produce, washing hands, and sanitizing kitchen surfaces. Grinding your own meat offers benefits such as freshness, quality, and customizable blends.
– There are several advantages to grinding your own meat for burgers, including control over the ingredients used and the ability to experiment with different flavors.
– Grinding at home can also be cost-effective compared to buying pre-ground meat.
– According to USDA standards, ground beef should be cooked to a minimum temperature of 160°F to ensure safety. However, if grinding at home, different temperature ranges can be used to achieve different levels of doneness, such as well done (160°F to 165°F), medium well (150°F to 155°F), medium (140°F to 145°F), medium rare (130°F to 135°F), and rare (120°F to 125°F).
– A two-stage cooking method is recommended for cooking hamburgers on the grill. The method involves using a lower-heat side to cook the burgers slowly, and then moving them to a higher-heat side to sear in the juices. This method allows for better control over temperature and doneness.
– Conclusion: The article discusses the importance of cooking ground meat to the appropriate temperature for safety, the risks of contamination in pre-ground meat, the benefits of grinding your own meat, and guidelines for achieving different levels of doneness when cooking burgers.

Continue Reading

Propane Pizza Oven Outdoor: Enhancing Your Backyard Culinary Experience!

Outdoor pizza ovens
Purchasing considerations for outdoor pizza ovens
Portable and affordable countertop models
Evaluating the location for the oven
Investing in a stand or table
Different fuel sources for outdoor ovens
Propane as the most common fuel option
Wood, wood pellets, and charcoal as alternative fuel options
Gas-powered ovens for ease of use and faster heating
Size and power considerations for outdoor pizza ovens
Minimum and maximum temperature requirements
Choosing oven size based on serving capacity
Considering the weight and portability of the oven
Recommendations for propane pizza ovens
Based on customer reviews, ratings, and research
Testing approach for different fuel options
Factors examined during testing, including construction and stone size
Assembly, space, and portability considerations
Temperature performance and heating time evaluation
Consistent cooking and crust crispiness
Actual temperature vs. manufacturer claims
Ease of use and design considerations
Cleaning features such as removable pizza stones and ashtrays
Versatility of the ovens for cooking other food items
Cooling down time of the ovens
Finding a pizza oven to suit different needs, budgets, and outdoor spaces
Encouragement to purchase expert-approved picks.

Continue Reading

The Best Outdoor Griddle: Unlocking Culinary Potential

– Traeger: The griddle has a spacious cooking surface and allows cooking in up to 3 temperature zones. No specific measurements, warranty, or pricing information provided.
– Grilla Grills Primate: This griddle is a gas griddle and grill combo. It has a 490 square inch cooking surface, 4 burners with 60,000 BTUs, and a 4-year warranty. It can be converted into a built-in griddle. The griddle is recessed to protect the burners from wind, giving an even cook. It has a paper towel holder, but the smallest cooking space among the griddles.
– Weber 36″ Griddle: This griddle has a 756 square inch cooking space, 4 burners with 60,000 BTUs, and a 5-year warranty. It offers even heat distribution and has a removable grease trap. The griddle does not perform well in windy conditions, and the shelves do not fold down.
– Le Griddle “The Ranch Hand”: Recommended as the best built-in griddle, it features 464 square inches of cooking space, can be fueled by propane or natural gas, has 2 U-shaped burners with 18,000 BTUs, and is made of 304 stainless steel construction with a large cast iron plate welded to it for heat distribution. It has easy cleaning with ice cubes, a 5-year warranty on the burners, and lifetime warranty on the stainless steel. The lid must be purchased separately.
– Halo Elite 4B: Recommended by bbqguys, it features 720 square inches of cooking space, 4 burners with 48,000 BTUs and a 37.25″ cooking height. It has a rear grease management system, spatula squeegee for easy cleaning, can be separated from the cart for portability, and includes a warming rack built into the lid. It has grooves for storage of Halo griddle tools, comes with a 5-year warranty, and is recessed to protect burners from wind exposure.
– Blackstone 36″ Griddle with air fryer and cabinets: It has 769 square inches of cooking surface, 4 burners with 60,000 BTUs, and a 1-year warranty. It offers ample storage with a cabinet and drawers, bonus features including air fryers and a warming drawer, and additional accessories such as a paper towel holder, trash bag holder, cutting board, tool hooks, and magnetic shelves. Disadvantages include a one-year warranty, exposed grease bucket collecting rainwater, difficult assembly, uneven heating, and small side shelves.
– LoCo Cookers 36″ Griddle Series II: It has a cooking space of 738 square inches, cooking height of 40 inches, 3 burners with 46,000 BTUs, and a 1-year warranty. It has large side shelves for storage, digital knobs and temperature regulation technology in burners, a protected grease bucket, baffle plates to separate cooking zones, and easy mobility with large wheels. Disadvantages include a small grease trap hole that can be tricky to clean.

Continue Reading

How to Reheat Corn on the Cob with Flavorful Results

– Boiling water is one option for reheating corn on the cob. Boil for 2 minutes.
– Air fryers can also be used to reheat corn. Preheat to 350°F and cook for 3 to 4 minutes.
– Grilling is another method. Brush corn with oil or butter and rotate on medium-heat grill for about 2 rotations.
– To freeze corn on the cob, cut off the kernels and spread them in a single layer on a parchment-lined tray. Freeze for 30 to 60 minutes, then transfer to a freezer-safe bag and label. Can be frozen for up to 12 months.
– To reheat frozen corn, rinse with cold water and cook in a skillet with butter for about 5 minutes. Season to taste.
– The oven method involves preheating to 400°F, adding water to the baking dish, covering with aluminum foil, and reheating for 5 minutes.
– The broiler method involves preheating the broiler, placing the corn on a rack over a sheet pan, broiling for 1 minute, rotating and repeating the process twice.
– The microwave method involves placing the corn in a microwave-safe dish with water, covering with a damp towel, microwaving for 30 seconds, flipping and microwaving for another 30 seconds.

Continue Reading

What is Picanha? Exploring the Origins, Culinary Uses, and Popular Recipes

– Picanha is a cut of beef popular in Brazil and Latin American countries
– Also known as Sirloin Cap or Rump Cap in the United States
– Comes from the rump area above the butt of the animal
– Has a thick layer of fat
– Tastes like sirloin, tender and juicy with a lot of beefy flavor
– The fat cap on the steak is edible and adds flavor
– Can be cooked by searing the meat fat side down and slicing it into individual steaks
– Can also be cooked on long metal skewers with the fat layer still on
– Picanha is gaining popularity in the United States but can still be difficult to find
– Can be prepared in various ways such as grilling, smoking, or rotisserie
– Suggested seasonings include coarse salt, black pepper, and olive oil
– Other steak seasonings or marinades can be used
– Recommends finding a local butcher shop that does full animal breakdown for purchasing picanha in the United States
– PorterRoad.com is a specialty butcher that sells picanha online and can ship to any location within the 48 continuous states
– Advises checking stock availability as it sells out quickly
– No information about picanha itself provided
– Discusses different ways to prepare picanha and where to buy it in the United States
– Provides links to the author’s blog and cookbooks

Continue Reading

Temperature for Medium Burger: The Perfect Safe Cook

– The USDA recommends a minimum safe temperature of 160 F/71 C for ground meat
– Recommended minimum temperature for ground meat burgers is 160˚F (71˚C)
– Other burger temperatures options:
– Medium-rare: 130° to 135° (54° to 57°C)
– Medium: 140° to 145° (60° to 63°C)
– Medium-well: 150° to 155° (66° to 68°C)
– Cook medium-rare burgers for about 2 1/2 minutes per side or five minutes total
– Thicker patties may require more cooking time
– Some pinkness in burgers is okay if desired

Continue Reading